
How to Add a New Party in Onsite
How to add a new party in Onsite — selecting the party type, filling in all available fields, adding addresses with GST, and adding bank account details. Parties added to the Library are immediately available across all projects.
Before You Start
- You need Admin or a role with Library access
- Have the party’s phone number, GST number, and bank account details ready if applicable
- For Staff parties, have their UAN, PF Number, and ESI Number ready for payroll compliance
What Is a Party?
A party is any person or organisation your company transacts with — clients, vendors, suppliers, subcontractors, staff, workers, or investors. Every financial transaction in Onsite is linked to a party. Adding a party to the Library makes them available for selection across all projects without re-entering their details each time.
How to Open the Party Library
- Click Library in the left sidebar
- Click Party Library
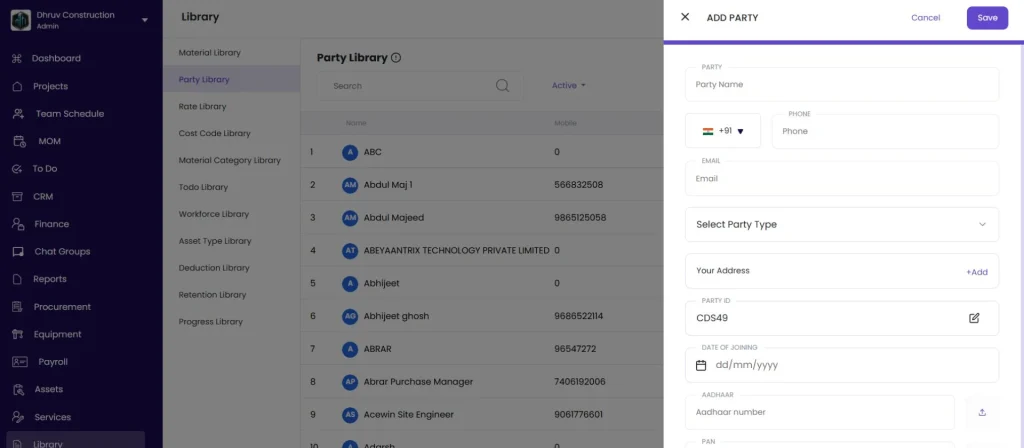
- Click + Add Party in the top right corner
The Add Party panel opens on the right side.
Step 1: Fill in Common Fields
These fields appear for all party types:
| Field | Required | What to Enter |
|---|---|---|
| Party Name | Yes | Full name of the person or company |
| Phone | No | Mobile number with country code (default: +91) |
| No | Email address | |
| Party Type | Yes | Select from the dropdown (see types below) |
| Party ID | No | Auto-generated reference code — editable to match your internal coding system |
| Date of Joining | No | Join date — useful for HR and payroll tracking |
| Opening Balance | No | Prior balance owed to or from this party before you started tracking in Onsite |
| Aadhaar | No | Upload Aadhaar card (image or PDF) |
| PAN | No | Upload PAN card (image or PDF) |
Step 2 — Select the Party Type
| Party Type | Who It Is |
|---|---|
| Client | Project owners, developers, or anyone who pays you for work |
| Staff | Employees on monthly or daily payroll |
| Worker | Daily wage or casual workers |
| Investor | Financial investors or partners |
| Labour Contractor | Contractors who supply labour teams |
| Material Supplier | Vendors who supply construction materials |
| Equipment Supplier | Vendors who supply or hire out equipment |
| Contractor | General contractors |
| Other Vendor | Any vendor that does not fit the above categories |
The Party Type you select controls which additional fields appear in the form.
Step 3 — Additional Fields for Staff
When Party Type is set to Staff, four extra fields appear for payroll and statutory compliance:
| Field | What to Enter |
|---|---|
| UAN Number | Universal Account Number for PF tracking |
| PF Number | Employee’s Provident Fund account number |
| ESI Number | Employee State Insurance number |
| Father’s Name | For HR and ID records |
Step 4 — Add an Address (with GST)
Click + Add next to Your Address to open the New Address dialog.
| Field | What to Enter |
|---|---|
| Address Heading | Label for this address (e.g. “Registered Office”, “Site Office”, “Delhi Branch”) — for internal identification only |
| GST | The party’s GSTIN for this address — required for GST-compliant purchase invoices |
| Address Line 1 | Street address |
| City | City name |
| State or Province | State name |
| ZIP or Postal Code | PIN code |
| Country | Default: India |
Click Save.
💡 A party can have multiple addresses. Click + Add again to add a second address. If a supplier has GST registrations in multiple states, add one address per state with its own GSTIN. The correct GSTIN then auto-fills on purchase invoices based on which address is selected.
Step 5 — Add a Bank Account
Click the Bank Account row to open the Add New Account dialog.
| Field | Required | What to Enter |
|---|---|---|
| Account Holder Name | Yes | Name on the bank account |
| Account Number | Yes | Full bank account number |
| IFSC Code | Yes (India) | 11-character IFSC code |
| Bank Name | Yes | Name of the bank |
| Bank Address | No | Branch address |
| IBAN Number | No | Required only for international payments |
| UPI Number | No | UPI ID for digital payments |
Step 6 — Save
Click Save in the top right of the Add Party panel.
The party is added to the Party Library and is immediately available for selection across all projects, transactions, procurement, and payroll.
About Opening Balance
The Opening Balance field records any pre-existing financial relationship with the party before you started using Onsite.
| Scenario | What to Enter |
|---|---|
| You owe the vendor Rs 35,000 from before Onsite | Enter Rs 35,000 as a debit (To Pay) |
| The client owes you Rs 50,000 from before Onsite | Enter Rs 50,000 as a credit (To Receive) |
| No prior balance | Leave at zero |
Opening balance entries appear in the party’s ledger as the starting point for all subsequent transactions.
Tips
- Set the correct Party Type from the start. The type controls which fields are available and how the party appears in reports. Staff parties get payroll fields; vendor types get GST and bank fields.
- Party ID is auto-generated but can be customised. If your company uses an internal vendor or client code, match it here so the party is easy to find.
- GST is stored per address, not per party. If a vendor has operations in multiple states with different GSTINs, add a separate address for each state.
- Opening Balance should be set once during initial setup. Retroactively adding opening balances mid-project distorts the party ledger history.
- Uploading Aadhaar and PAN for workers and staff creates a digital compliance record accessible from the party profile.
If Something Goes Wrong
| Problem | Likely Cause | What to Do |
|---|---|---|
| Cannot find Party Library | Library not in sidebar or role lacks access | Click Library in the left sidebar. If it is not visible, ask Admin to enable Library access on your role. |
| Staff-specific fields (UAN, PF) not showing | Party Type not set to Staff | Change the Party Type dropdown to Staff — the extra fields appear immediately |
| GST field not appearing | Address not yet added | Click + Add next to Your Address and fill in the address form — GST field appears within it |
| IFSC code not accepted | Incorrect format | IFSC codes are exactly 11 characters. Verify on the bank’s cheque book or on the RBI IFSC lookup. |
| Party not appearing in transaction dropdowns after saving | Party not linked to the project | Go to the project’s Party tab and add the party to the project |
| Duplicate party created | Party already existed in the Library | Search the Library by name or phone before creating. If a duplicate was created, contact support to merge. |