
How to Set Up Multi Level Approval
How to create approval rules for documents in Onsite. Approval rules require specific roles to review and approve a document before it can proceed, based on the document type and the document’s total amount. This applies across Purchase Orders, Sales Invoices, Payment Requests, Task Progress, Material entries, and more.
Before You Start
- You need Admin access
- Roles must be set up in Roles and Access before you can assign them as approvers. If the role you need does not exist, create it first.
- Decide which document types need approval, which amount ranges should trigger approval, and how many approval levels are needed before enabling rules.
How Multi Level Approval Works
When an approval rule is published for a document type:
- A team member creates the document (e.g. a Purchase Order for Rs 45,000)
- The system checks if the document amount falls within any active approval rule range
- If it does, the document is placed in a Pending Approval state and cannot be processed further until approved
- The assigned approver role receives a notification and sees the document in the Pending Approvals queue
- The approver reviews and either approves or rejects the document
- If multiple approval levels are set, each level must approve in sequence before the document moves forward
Documents outside any active amount range are not held for approval and proceed normally.
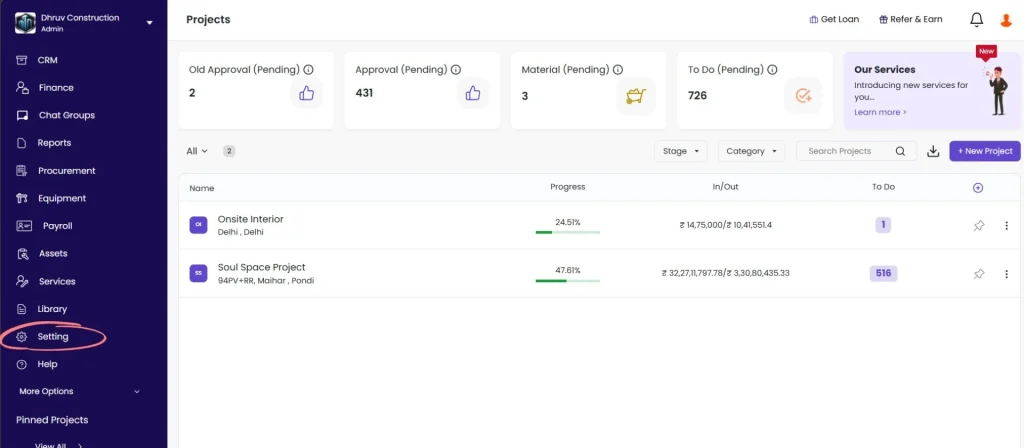
Step 1: Go to Settings
Click Setting in the left sidebar.
Step 2: Open Multi Level Approval
Click Multi Level Approval from the Settings menu.
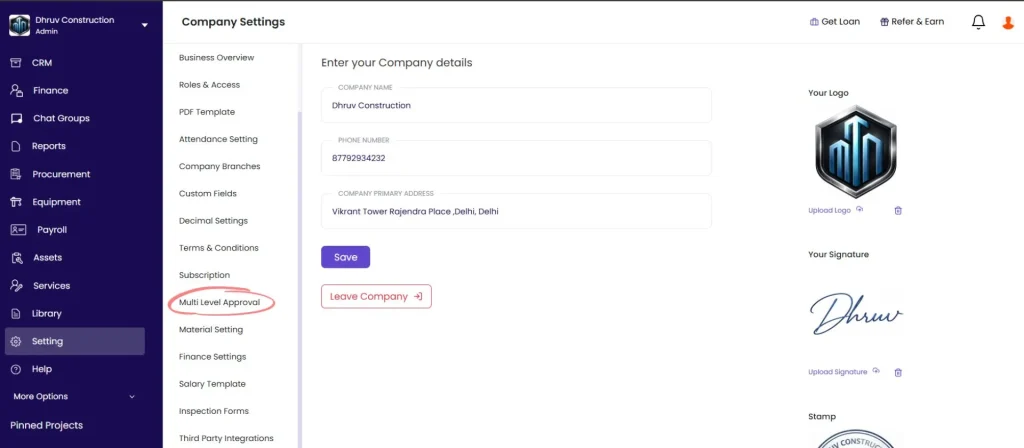
The left panel shows all available document types.
Step 3: Select the Document Type
Click the document type you want to configure from the left panel.
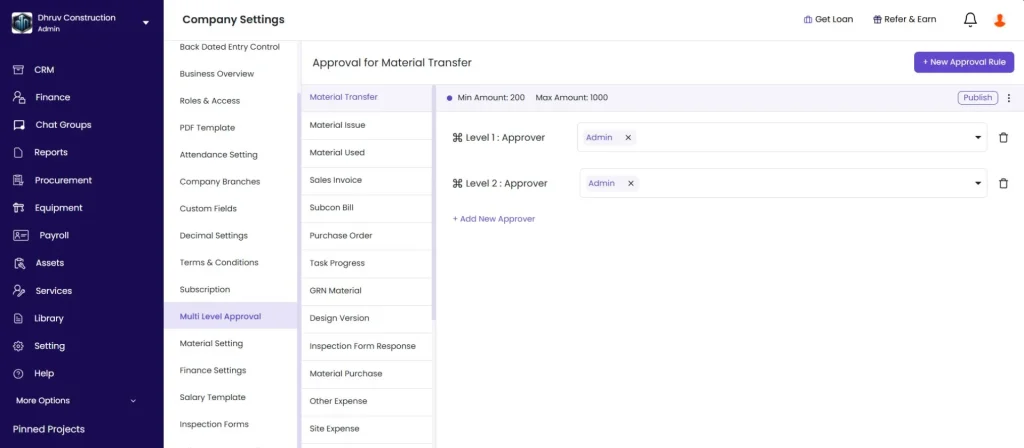
All available document types:
| Document Type | What It Controls |
|---|---|
| Purchase Order | Approval before a PO is confirmed to a vendor |
| Payment Request | Approval before a payment advance is processed |
| Payment Entries | Approval before payment in or out is recorded |
| Sales Invoice | Approval before a client invoice is finalised |
| Sales Invoice Retention | Approval before retention on a sales invoice is released |
| Subcon Bill | Approval before a subcontractor bill is accepted |
| Subcon Retention | Approval before subcontractor retention is released |
| Subcon Workorder | Approval before a subcontractor work order is activated |
| RFQ | Approval before a Request for Quotation is published to vendors |
| GRN Material | Approval before a Goods Received Note is confirmed |
| Material Purchase | Approval before a material purchase booking is posted |
| Material Transfer | Approval before materials are transferred between stores |
| Material Issue | Approval before materials are issued to a subcontractor |
| Material Used | Approval before material consumption is recorded |
| Other Expense | Approval before a non-project or overhead expense is recorded |
| Site Expense | Approval before a site-level expense entry is posted |
| Salary Expense | Approval before salary expense is recorded from attendance |
| Equipment Expense | Approval before an equipment-related expense is posted |
| Asset Transfer | Approval before an asset is transferred between locations |
| Task Progress | Approval before a task progress update is accepted |
| Design Version | Approval before a new design file version is published |
| Inspection Form Response | Approval before an inspection response is marked complete |
Step 4: Add a New Approval Rule
Click + New Approval Rule.
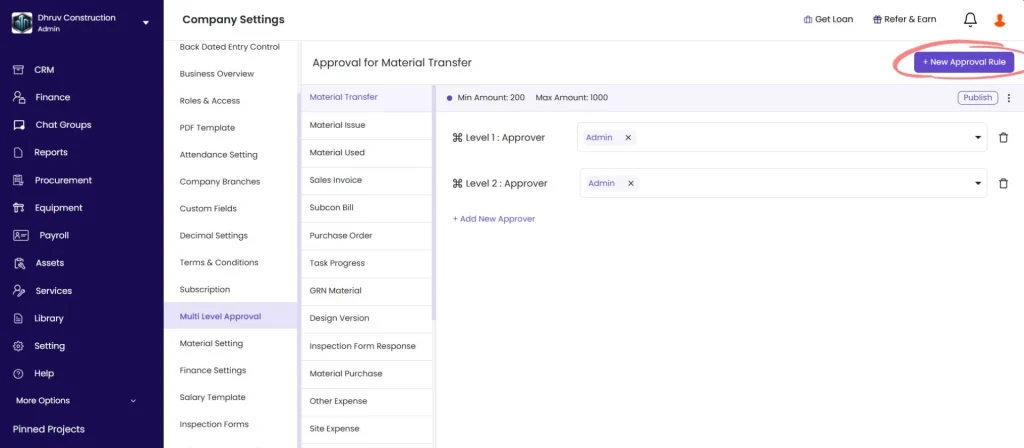
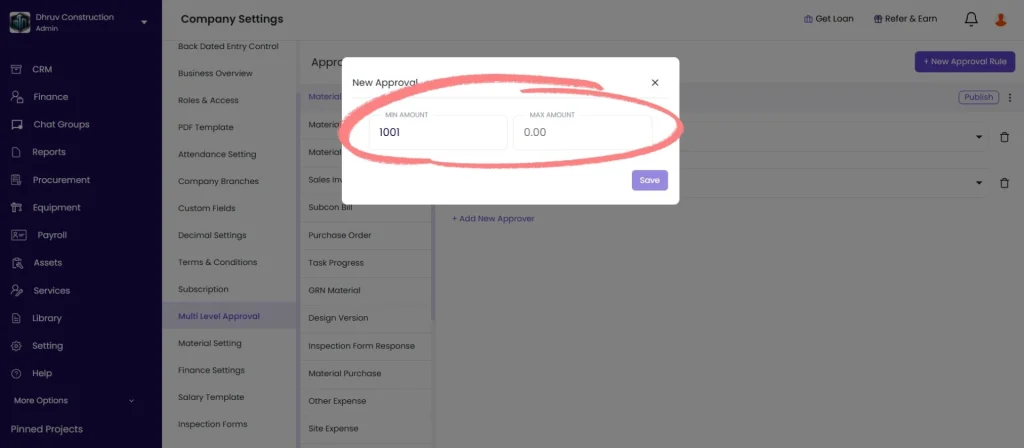
A New Approval popup appears.
Step 5: Set the Amount Range
Enter the amount range for which this rule applies:
| Field | What to Enter |
|---|---|
| Min Amount | The minimum document amount for this rule to apply (e.g. 0) |
| Max Amount | The maximum document amount for this rule to apply (e.g. 50000) |
Click Save.
The rule appears in the list showing the range (e.g. Min: 0 / Max: 50,000).
Amount range planning guide:
| Business Need | Suggested Setup |
|---|---|
| All POs regardless of amount require approval | Min: 0, Max: a very large number (e.g. 99,99,99,999) |
| Only large POs require approval | Min: 50,000, Max: 99,99,99,999 |
| Small amounts need one approver, large amounts need two | Create two separate rules with different ranges and different approver levels |
| No approval needed below a threshold | Leave no rule active for that range |
You can create multiple rules for different amount ranges on the same document type.
Step 6: Add Approvers
Click + Add New Approver under the rule.
A dropdown appears listing all available roles. Select the role that must approve documents in this range.
The approver is saved as Level 1 Approver.
To add a second approval level, click + Add New Approver again and select a different role. This becomes Level 2 Approver. Level 2 only receives the document after Level 1 has approved it.
To add a third level, repeat the same step. Each additional approver becomes the next sequential level.
Multi-role per level: You can select more than one role for the same level. In this case, any one person with that role can approve the document to move it to the next level.
Step 7: Publish the Rule
Click Publish next to the rule.
The rule status changes to Published. From this point, any document of the selected type whose amount falls within the range will require approval before it can proceed.
⚠️ A rule that is saved but not published is inactive. It will not hold any documents for approval until you publish it.
Step 8: Where Approvers Action Pending Documents
Approvers can review and action pending documents from two places:
At project level: Go to the project header and click the Pending Approvals icon (bell or flag icon, top right). The panel lists all items waiting for approval on that project, grouped by document type.
At company level: Go to the company-level approvals view to see pending items across all projects.
Each pending item shows the date, document details, submitted by, and value. Click any item to open it and approve or reject.
Tips
- Rules must be Published to take effect. Saved but unpublished rules are inactive and will not hold documents.
- Amount ranges can overlap across rules on the same document type, but keep them clean to avoid confusion about which rule applies.
- To cover all amounts with no upper limit, set Max Amount to a very large number such as 99,99,99,999.
- To edit a rule, click the three-dot (⋮) icon next to the rule and select Edit. Update the amount range and click Save.
- To delete a rule, click the three-dot (⋮) icon and select Delete, then confirm.
- If a document type needs no approval at all, simply do not create a rule for it or keep any existing rule unpublished.
- Approval rules are company-wide. They apply to all projects, not individual projects.
- The approver role must have at least one active user assigned to it for approvals to be actionable. A role with no users assigned means no one can approve, and documents will remain stuck in pending.
If Something Goes Wrong
| Problem | Likely Cause | What to Do |
|---|---|---|
| Cannot see Multi Level Approval | Not an Admin | Ask your Admin to configure the rules or grant Admin access |
| Approval not triggering on documents | Rule is saved but not Published | Click Publish next to the rule |
| Cannot add approvers to a rule | Rule amount range not saved yet | Save the amount range first by clicking Save in the popup, then add approvers |
| Documents stuck in pending, no one can approve | Role has no users assigned | Go to Roles and Access and assign at least one team member to the approver role |
| Rule active but some documents not held for approval | Document amount falls outside the rule range | Check the Min and Max values and adjust the range to cover the amount |
| Multiple rules on same document type conflicting | Overlapping amount ranges | Review the rules list and adjust ranges so they do not overlap |
| Approver does not see the pending item | Viewing wrong project or wrong level | Check that the approver is looking at the correct project’s Pending Approvals and that Level 1 has already approved if they are Level 2 |
| Need to change the approver for a rule | Roles change within the team | Edit the rule, remove the old role, add the new role, and save |