
How to Set Up and Manage the Warehouse
How to create the company warehouse, add materials with opening stock, receive materials from vendors, transfer materials to projects, view stock levels, record all transaction types, and download warehouse reports. Also covers the difference between the company warehouse and project-level inventory.
Before You Start
- You need Admin access to create the warehouse
- Materials must exist in the Material Library before they can be added to the warehouse
- Supplier parties must be added before receiving materials from a vendor
Company Warehouse vs Project Inventory
| Feature | Company Warehouse | Project Inventory |
|---|---|---|
| Access | Left sidebar, Warehouse | Inside a project, Material tab |
| Scope | Central store for all materials | Materials for one specific project |
| Number allowed | One per company | One per project |
| Best used for | Central stock management and transfers to sites | Day-to-day site material tracking |
💡 Materials transferred from the company warehouse to a project appear in that project’s Material tab automatically. Both the warehouse stock and the project stock update immediately when a transfer is recorded.
Part 1 — Creating the Warehouse
Click Warehouse in the left sidebar.
If no warehouse exists yet, a setup prompt appears automatically.
- Enter the Warehouse Name (e.g. “Central Store”, “Head Office Warehouse”, “Delhi Warehouse”)
- Click Save
The warehouse is created and the Inventory tab opens.
⚠️ Onsite supports one warehouse per company. The name can be changed after creation but the warehouse cannot be duplicated.
Part 2 — Adding Materials and Opening Stock
Once the warehouse is created, add all materials that will be tracked here along with their current stock levels.
Option A — Import via CSV (Bulk Upload)
Use this for large material lists.
- Click Add Material
- Click + Import BOM
- Click the upload icon and select your CSV file
The CSV must follow this format:
| Column | What to Enter |
|---|---|
| Material Name | Must match the name exactly as it appears in the Material Library |
| Opening Stock | Current quantity physically in the warehouse at the time of setup |
| Estimated Quantity | Expected total usage |
| Budgeted Unit Rate | Cost per unit in Rs |
⚠️ Material names in the CSV must match the Material Library exactly, including capitalisation. Rows with unmatched names will not import. Add new materials to the Library first before importing.
Option B — Add Manually
Use this for adding a small number of materials.
- Click + Add Material
- Search and select materials from the Material Library
- Enter the Opening Stock quantity for each selected material
- Click Next
- Click Save
Part 3 — Receiving Materials into the Warehouse
When materials are physically delivered to the warehouse from a vendor, record the receipt to update stock.
- In the inventory list, click the material that was received
- Click Received
- Search for and select the material
- Click Receive
- Select the Party Name (the vendor who delivered)
- Click + Add Material and enter the received quantity
- Click Next
- Click Save
Stock levels update automatically after saving.
Alternatively, use the Transaction tab:
- Click the Transaction tab
- Click + Create Transaction
- Select + Received
- Fill in the vendor, materials, quantities, and date
- Click Save
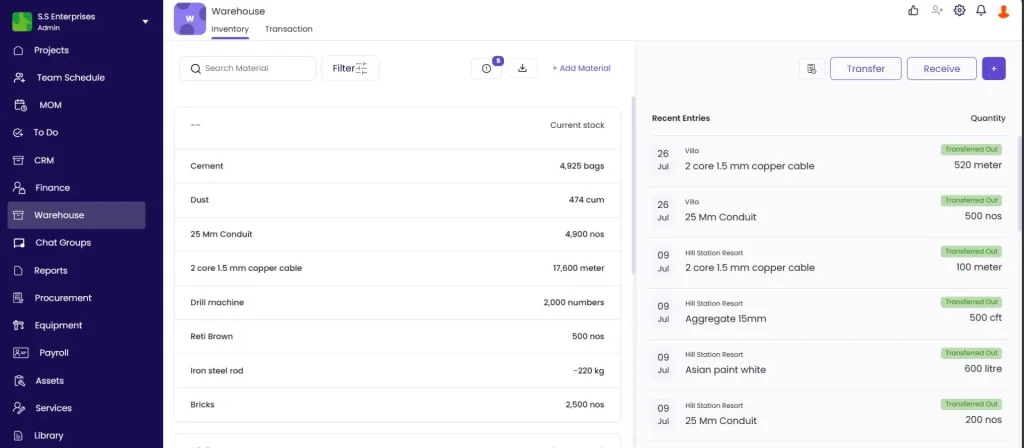
Part 4 — The Inventory Tab
Click the Inventory tab to see current stock levels across all materials.
Material List
Each row shows: Material name, current stock quantity, and unit (e.g. 80 bags, 500 nos).
- Use the Search Material field to find a specific material by name
- Use the Filter button to narrow by material category or type
- Negative stock values (e.g. -20 cft) indicate more material was issued or transferred than was received — check for missing receipt entries
Material Detail Panel
Click any material in the list to open its detail panel on the right side.
Header: Material name, code, category, and Remaining on Site (current stock quantity).
Key metrics:
| Metric | What It Shows |
|---|---|
| Estimated Quantity | Planned or expected total quantity |
| Stock In | Total received into the warehouse |
| Stock Out | Total issued or transferred out |
| Remaining on Site | Current stock (Stock In minus Stock Out) |
Sub-tabs:
| Sub-tab | What It Shows |
|---|---|
| All Entries | Complete chronological history of all movements for this material |
| Stock In | Inbound entries only: received, purchased, opening stock |
| Stock Out | Outbound entries only: transferred to projects, issued, sold |
Each entry shows the date, project or party involved, transaction type, and quantity (positive for in, negative for out).
Recent Entries (Right Sidebar)
Shows the latest stock movements across all materials without opening individual records:
| Column | What It Shows |
|---|---|
| Date | Date of the entry |
| Project | Project the movement is linked to |
| Material | Material name |
| Quantity | Amount moved |
| Type | Entry type (e.g. Opening Stock, Transfer Out, Received) |
Part 5 — The Transaction Tab
Click the Transaction tab to see the full log of all material movements and financial transactions across the warehouse.
Transaction List Columns
| Column | What It Shows |
|---|---|
| Party / Project | The project or party involved |
| Transaction Type | e.g. Material Transfer Out, Material Received, Material Purchased |
| Amount | Financial value of the transaction |
| Status | Paid, Partially Paid, or Unpaid |
Use the Date Filter, the party or material search, and the transaction type filter to narrow down the list.
Creating a Transaction
Click + Create Transaction and select the type:
| Transaction Type | What It Does |
|---|---|
| + Transfer | Move materials from the warehouse to a project or another location |
| + Received | Record materials received from a supplier |
| + Request | Raise a material request |
| + Purchased | Record a material purchase linked to the warehouse |
| + Return | Record materials returned to the warehouse from a project |
| + Material Sales | Record materials sold or disposed of |
| + Production | Record production-related material movements |
| + Import BOM | Import a Bill of Materials |
Transferring Materials to a Project
Use + Transfer to move materials from the company warehouse to a project site.
- Click + Create Transaction
- Select + Transfer
- Select the destination project
- Add materials and quantities to transfer
- Click Save
After saving, the transferred materials appear in the destination project’s Material tab as received stock. The warehouse stock reduces by the transferred quantity.
Part 6 — Downloading Warehouse Reports
Click the Download icon in the top bar of the Warehouse module.
A modal opens with the following options:
| Field | Options |
|---|---|
| Warehouse Name | The warehouse to report on |
| Report Type | Material Inventory or Material Purchase |
| Date Filter | All Time or a custom date range |
| Format | PDF or Excel |
Select your options and click Download PDF or Download Excel.
For more detailed warehouse analytics, see How to Use Materials and Inventory Reports in Onsite — the Warehouse section includes Warehouse Stock Report, Warehouse Transaction Report, and Warehouse Current Stock.
Tips
- Set opening stock accurately at the time of setup. The opening stock is the baseline for all future stock calculations. An incorrect opening stock means every subsequent balance will be off by the same amount.
- Use CSV import for large material lists. Manually adding dozens of materials one by one is slow. Prepare the CSV once using the format above and import in bulk.
- Always record receipts for every delivery. Every delivery to the warehouse that is not recorded in Onsite creates a stock discrepancy that compounds over time.
- Use the Stock In and Stock Out sub-tabs in the material detail panel to audit discrepancies quickly. If stock is unexpectedly low, check Stock Out for transfers or issuances that were not expected.
- Negative stock means more material has been issued or transferred than was received. This always means one of two things: a receipt entry is missing, or a transfer was recorded for the wrong quantity.
- Material movements recorded in the warehouse (transfers, receipts) are automatically linked to the corresponding project’s Material tab. There is no need to record the same entry in both places.
- The Recent Entries sidebar on the Inventory tab gives a quick view of the latest warehouse activity without opening individual material records.
If Something Goes Wrong
| Problem | Likely Cause | What to Do |
|---|---|---|
| Warehouse tab shows a setup prompt | No warehouse created yet | Enter a warehouse name and click Save |
| Material not found when adding | Not in the Material Library | Go to Library in the left sidebar, open Material Library, and add the material first |
| CSV import fails | Column names changed or material names do not match the Library | Check that the column headers are unchanged and all material names match the Library exactly |
| Stock not updating after receiving | Receipt not saved | Re-open the Receive flow and check that a receipt number has been generated (confirms it was saved) |
| Stock shows negative | More issued or transferred than received | Check Recent Entries for the material and look for missing receipt entries |
| Transfer not appearing in the destination project | Transfer saved against the wrong project | Open the transfer entry in the Transaction tab, check the destination project, and correct if needed |
| Cannot add materials | Material Library is empty | Go to Library in the left sidebar, open Material Library, and add materials before returning to the warehouse |