
How to Create and Manage Purchase Orders
How to create a Purchase Order (PO) in Onsite from a Material Request, from an RFQ, or by adding items directly, and how to manage, send, download, and track POs. Also covers the PO status flow and how to view items pending receipt.
Before You Start
- The vendor must be added as a party in CRM before they can be selected on a PO
- Materials must exist in the Material Library before they can be added to a PO
- If creating from a Material Request, the MR must be raised and saved first
- If converting from an RFQ, supplier quotation entries must be punched in the RFQ first
Where Purchase Orders Fit in the Procurement Flow
| Step | Action | Where |
|---|---|---|
| 1 | Site team raises a Material Request (MR) | Project, Material tab |
| 2 | Procurement team creates an RFQ and collects supplier quotes | Procurement, left sidebar |
| 3 | Purchase Order raised for selected supplier | Procurement, left sidebar |
| 4 | Supplier delivers materials, GRN is created | Project, Material tab |
| 5 | Material Purchase bill recorded against GRN | Project, Transaction tab |
A PO can be created directly without an MR or RFQ for straightforward purchases where quotes are not needed.
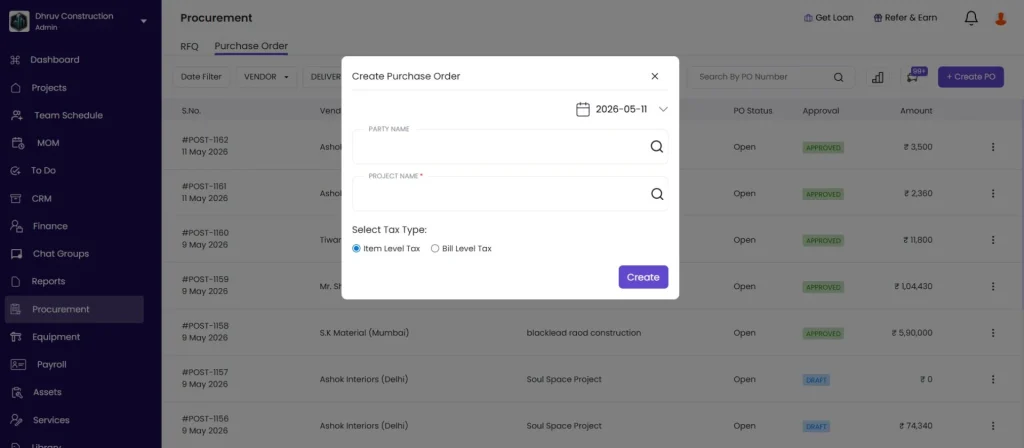
Step 1: Open Purchase Orders
Click Procurement in the left sidebar.
Click Purchase Order.
Click + Create PO.
Step 2: Select Vendor and Project
| Field | What to Enter |
|---|---|
| Party Name (Vendor) | Select the supplier from the dropdown. If not visible, add them as a party in CRM first. |
| Project | Select the project this PO is for |
| Bill To | Select your company address. If your company has multiple GST registrations, select the correct branch. |
| Ship To | Select the delivery address. This is where the materials will be delivered. |
Click Create.
Step 3: Add Materials
You can add items to the PO using any of three options, and you can combine them in the same PO.
Option A — From Material Request
- Click the Material Request tab
- Tick the items you want to include from the approved MR
- Click Next
This links the PO to the original MR. The MR status updates to Ordered once the PO is created.
Option B — Add Directly from Library
- Click + Add Material
- Search for the material by name or category
- Select it from the library
- Repeat to add more items
- Click Next
Use this when ordering materials that were not raised via an MR, or when adding additional items to a PO that already has MR items.
Option C — Convert from an RFQ
This option is accessed from within the RFQ, not from the PO creation screen.
- Go to Procurement, then RFQ
- Open the relevant RFQ
- Click the supplier’s name and open their Supplier Entries
- Click Convert to PO
- Select the items to convert
- Click Convert to PO
- Optionally add items from the Material Request tab
- Click Next and continue with PO details
The PO is pre-filled with the supplier’s quoted rates from the RFQ
Step 4: Enter Quantities and Tax
For each item in the PO:
| Field | What to Enter |
|---|---|
| QTY | Quantity being ordered |
| Unit Rate | Rate per unit (pre-filled if converting from RFQ) |
| Tax % | GST rate for this item (e.g. 18% for cement, 5% for paint). Can be set per line item. |
| Discount | Optional. Percentage discount on this item. |
Step 5: Add Financial Details and Terms
| Field | What to Enter |
|---|---|
| Additional Discount | Optional. A fixed rupee discount on the total. |
| Round Off | Tick to round off the final total to the nearest rupee. |
| Payment Terms | Enter your agreed terms (e.g. “10% advance, 90% on delivery”). |
| Reference No. | Optional. Your internal PO reference number. |
| Terms and Conditions | Pre-filled from Settings if configured. Edit for this PO if needed. |
Step 6: Save and Publish
Click Save and Publish to finalise the PO and make it available to share with the vendor.
The system auto-generates a PO number (e.g. PO-86).
💡 If you are not ready to publish, click Save as Draft. The PO is saved but not sent. You can return to edit and publish it later.
PO Status Flow
| Status | What It Means |
|---|---|
| Draft | PO saved but not yet published |
| Approved | PO published and confirmed |
| Ordered | Materials have been ordered and are pending delivery |
| Rejected | PO was cancelled or declined |
You can update the status directly from the PO detail view.
Managing a Published PO
Open a PO from the Purchase Order list to take further actions:
– Send to Vendor
Click the send icon to share the PO directly with the vendor via email or WhatsApp.
– Download
Click the Download icon.
| Format | When to Use |
|---|---|
| Sharing with the vendor or keeping as a formal record | |
| Excel | Sharing a cost breakdown internally or with the project team |
Toggle Quantity visibility in the download options if you need to hide quantities on the vendor copy.
– Recall
Click the Recall icon to pull a published PO back to draft for editing. Use this when details need to be corrected after publishing rather than creating a new PO.
– Edit
After recalling, click Edit to update items, quantities, rates, or terms. Publish again when changes are complete.
– Three-Dot Menu
Click the three dots (⋮) on a PO for additional actions including delete or duplicate.
Tracking What Has Been Ordered but Not Yet Received
Once a PO is published, its items appear in the Pending to Receive panel on the project’s Material tab.
To view:
- Open the project
- Click the Material tab
- Look for the Pending to Receive badge at the top
- Click it to see all PO items awaiting delivery
Each item shows the material name, ordered quantity, received quantity to date, and remaining quantity outstanding. This gives the site team visibility into what to expect from the vendor without needing to open each PO.
Viewing All POs for a Project
Go to the project, click the Material tab, then click PO Items.
This shows all PO items for the project including material name, ordered quantity, vendor, and status — useful for reviewing total procurement across all POs for a project in one view.
Tips
- You can mix item sources in one PO. Add items from a Material Request and from the Library in the same PO if needed.
- Set tax per line item. Different materials attract different GST rates (e.g. 18% for cement, 5% for paint). Setting the correct rate per item ensures the PO total is accurate.
- Use Reference No to match POs to vendor invoices and GRNs. A consistent internal numbering system makes reconciliation faster.
- Use Recall if you need to edit a published PO rather than creating a duplicate. A recalled PO keeps the same PO number.
- Convert from RFQ when you have compared supplier quotes. The PO pre-fills with the supplier’s rates from the RFQ, eliminating manual re-entry.
- Download as PDF to send to the vendor. Download as Excel for internal cost review or sharing with the project team.
- Check Pending to Receive regularly. Outstanding PO items that have not been received indicate either a delivery delay or a GRN that has not been created yet.
If Something Goes Wrong
| Problem | Likely Cause | What to Do |
|---|---|---|
| Vendor not in the dropdown | Not added as a party | Add the vendor as a party in CRM first |
| Material not found when adding from Library | Not in the Material Library | Go to Library in the left sidebar, open Material Library, and add the material |
| No items in the Material Request tab | No MRs raised for this project, or MR not approved | Raise a Material Request from the project’s Material tab first |
| Convert to PO not visible in RFQ | Supplier quotation not entered | Go to the RFQ, open Supplier Entries, and punch the supplier’s quotation first |
| PO quantity exceeds the MR quantity | More than the requested quantity was entered | Check the original MR and adjust the PO quantity |
| Cannot edit a published PO | PO is in Published or Approved state | Use Recall to bring it back to Draft, then edit |
| PO not appearing in Pending to Receive | PO not yet published | Publish the PO first. Draft POs do not appear in Pending to Receive. |
| All quantities show as received but GRN not created | GRN was recorded against the wrong PO or supplier | Check GRNs in the Material tab for this project and verify the linked PO |