
How to Use the Task Tab on the Onsite Mobile App
How to use the Task tab in a project on the Onsite mobile app — reading the task list, filtering and sorting, adding tasks, updating progress with measurements, uploading photos, logging material usage, filling inspection forms, adding To-Dos, and changing task status.
Before You Start
- You must be inside a project
- Tasks must have been created (on web or mobile) before they appear in the list
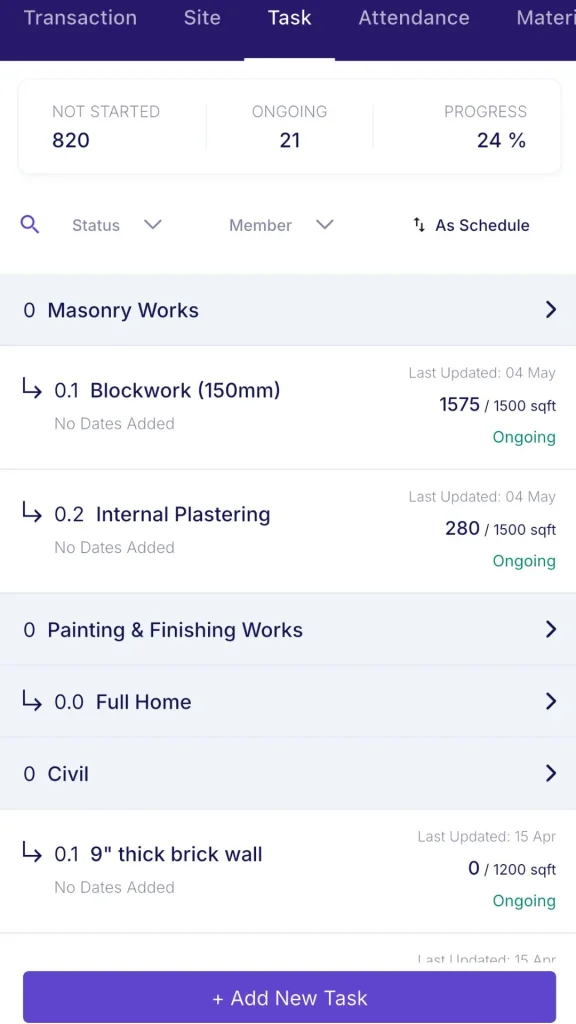
What the Task Tab Shows
Open a project and tap the Task tab.
Header counters:
| Counter | What It Shows |
|---|---|
| Not Started | Number of tasks not yet begun |
| Ongoing | Number of tasks currently in progress |
| Progress % | Overall project task completion percentage |
Below the counters: a Search bar, a Status filter dropdown, a Member filter dropdown, and a Sort icon.
Task List Structure
Tasks appear in a numbered list. Sub-tasks are indented under their parent task.
Each task row shows:
- Task name
- Date range (start to end)
- Progress (quantity done vs target, e.g. “226 / 1000 sqft”)
- A Delayed by X days badge if the task is behind schedule
Filtering and Sorting
Status filter options: All, Ongoing, Not Started, Completed, On Hold, Needs Revision.
Member filter: Tap to show only tasks assigned to a specific team member. Use this during daily check-ins to review each person’s workload.
Sort options:
| Sort | What It Does |
|---|---|
| As Schedule | Shows tasks in planned order |
| Last Updated | Shows most recently updated tasks first |
Adding a Task
Tap the + button to open the Add Task form.
| Field | What to Enter |
|---|---|
| Description / Title | Task name |
| Duration (Days) | Number of days planned |
| Start Date / End Date | Task dates |
| Progress Unit | Default is %. Change to numbers, sqft, cft, RMT, etc. if tracking by measurement |
| Est. Quantity | Target quantity (e.g. 100 nos, 1000 sqft) |
| Assignee | Team member responsible |
| Attachments | Upload any reference files |
Tap Save to create. Tap Save and New to create and immediately add another task.
Task Detail Screen
Tap any task to open its detail screen.
Header fields:
| Field | What It Shows |
|---|---|
| Assign to | Who is responsible for this task |
| Start / End Date | Planned dates and duration in days |
| Progress | Current progress vs target (e.g. 226 / 1000 sqft) with approval status badge |
| Todo | + Todo button — tap to add a To-Do item linked to this task |
| Inspection Form | Shows filled vs total count (e.g. 1/1). Tap to open the inspection form list. |
Activity feed:
Below the header fields is a chronological log of all activity on this task:
| Entry Type | What It Shows |
|---|---|
| Progress updates | Quantity entered with Approved or Pending status |
| Material usage | Material name, quantity used, and stock remaining |
| Text notes | Comments added by team members |
| Inspection results | Form name and Pass or Fail result |
| Photos | Photos uploaded against this task |
Bottom bar (action icons):
| Icon | What It Does |
|---|---|
| + Add Progress | Opens the progress entry form |
| Message input | Add a text comment to the activity feed |
| Photo | Upload a photo from camera or gallery |
| Attachment | Attach a file or document |
| Voice note | Record a voice note |
Adding Progress
Tap + Add Progress in the task detail.
| Field | What to Enter |
|---|---|
| Date | Defaults to today. Tap to change if entering for a past date. |
| Add Measurements | Optional checkbox. Enable to enter dimensions (Number x Length x Width) for area-based tasks. The progress quantity is calculated automatically from the dimensions. |
| Progress Qty | Quantity completed in the task’s unit (e.g. sqft, nos, cft) |
| Add Notes | Optional notes for this entry |
Tap Save Progress. The entry appears in the activity feed with a Pending or Approved badge depending on the approval settings for your project.
💡 For area-based tasks (flooring, plastering, painting measured in sqft), enable Add Measurements and enter Number, Length, and Width. For count-based tasks (doors, windows, light points measured in nos), enter the quantity directly in Progress Qty and leave measurements off.
Uploading Photos to a Task
From the task detail bottom bar, tap the photo icon to open the media picker:
| Option | What It Does |
|---|---|
| Camera | Take a photo directly |
| Gallery | Pick an existing photo from your device |
| Document | Attach a file |
Photos appear in the activity feed tagged with the uploader’s name and timestamp. They are also included in the DPR for the day they were uploaded.
Logging Material Used Against a Task
Tap the material icon in the task detail bottom bar to log material consumption against this task.
| Field | What to Enter |
|---|---|
| Material | Search and select from project inventory |
| Quantity | How much was used |
| Updated Stock | Shown automatically — stock level after this deduction |
| Add Notes | Optional |
| Tagged Task | Pre-filled with the current task name |
Tap Save. The entry appears in the activity feed and deducts from the project’s inventory immediately.
Adding a To-Do to a Task
Tap + Todo in the task detail header.
| Field | What to Enter |
|---|---|
| Work Name | Description of the To-Do item |
| Due Date | Target completion date |
| Type | Category (from the To-Do Library) |
| Repeat ToDo | Toggle ON to make it recurring |
| Assignee | Who is responsible |
| Project Name | Pre-filled |
| Task Name | Pre-filled with the current task |
Tap Save.
Filling an Inspection Form
Tap Inspection Form in the task detail header to open the inspection form list for this task. Each form shows its name, type, and trigger (e.g. Before Completion).
Tap Start to fill a form.
| Field | What to Do |
|---|---|
| Task Name | Pre-filled |
| Date | Today’s date — edit if needed |
| Checklist fields | Answer each item (Yes/No, Pass/Fail, number, or text as configured). Tap to add a Remark per item. |
| Attachments | Upload supporting photos for the inspection |
| Verdict | Tap Pass, Fail, or Save as Draft |
The result appears in the task activity feed. A Pass before marking the task Completed creates a documented quality checkpoint.
Changing Task Status
Tap the status badge in the top right of the task detail (e.g. “Ongoing”) to change it.
| Status | When to Use |
|---|---|
| Ongoing | Work is in progress |
| Not Started | Task has not begun |
| Completed | Task is fully done |
| On Hold | Temporarily paused |
| Needs Revision | Reviewed and requires rework |
| Cancelled | Task has been called off |
Task Options Menu
Tap the three-dot (⋮) icon in the task detail header for additional actions:
| Action | What It Does |
|---|---|
| Edit | Update the task name, dates, estimated quantity, or assignee |
| Delete | Permanently remove the task |
| Add Sub Task | Add a child task under the current task |
Tips
- The activity feed is the single best place to understand a task’s full history. Progress entries, material logs, photos, comments, and inspection results all appear in one chronological stream — no switching between tabs.
- Use the Member filter to see only tasks assigned to one person during a daily check-in or site walk.
- Use Last Updated sort to surface tasks that have had recent activity. This is faster than scrolling through the full list to find what changed today.
- The Delayed by X days badge on each task gives an instant overdue signal without opening the task.
- Attach a photo immediately after completing a task milestone. Photos uploaded against a task appear in the DPR automatically, reducing report preparation time.
- Fill the inspection form and mark Pass before marking a task Completed. This creates a quality checkpoint audit trail at the task level.
If Something Goes Wrong
| Problem | Likely Cause | What to Do |
|---|---|---|
| Task not showing in the list | Status or Member filter is active | Clear the Status and Member filters to see all tasks |
| Progress entry showing Pending instead of Approved | Approval is required for this project | Ask the project Admin or approver to approve the progress entry |
| Inspection Form shows 0/0 | No inspection form linked to this task | Ask Admin to create and link an inspection form to this task in Settings |
| Cannot add progress | Role does not have Task Management permission | Ask your Admin to check your role permissions |
| Material stock not deducting after logging usage | Material not in the project inventory | Add the material to the project’s Material tab first, then log usage |
| Photos not appearing in the DPR | Photos uploaded on a different date than the DPR date | Check the date of the photo in the activity feed and regenerate the DPR for the correct date |