
How to Use Punch In Out and Attendance on the Onsite App
How to punch in and out using facial AI recognition on the Onsite mobile app, how to upload worker face photos for verification, and how to mark daily attendance in the project Attendance tab for site staff and labour contractors.
Before You Start
- For facial recognition to work, each worker’s face photos must be uploaded in Payroll People before they can punch
- The project location must be set for auto-detection of the nearest project to work during punch-in
- If an attendance radius restriction is configured, workers must be physically within the set distance of the project location to punch
Part 1 — Punch In
Steps
- From the home screen, tap Punch in the quick actions bar
- The camera opens — look directly at it
- The app runs facial AI recognition and shows “Detecting…” then “Matched” when verified
- A Select Punch Location panel appears showing nearby projects sorted by distance — the nearest project is pre-selected automatically
- Tap a different project if needed
- Tap to confirm — the punch is recorded
The screen shows People Punched In (N) with the current date and time confirming the entry.
⚠️ Attendance Radius Restriction: If your project has a radius restriction enabled in Attendance Settings, you must be within the configured distance of the project location to punch in. If you are outside the radius, the punch will not be allowed. Move closer to the site or ask your Admin to adjust the radius.
Part 2 — Punch Out
- Tap Punch from the home screen (or tap your punch status in the home screen bottom bar)
- The camera opens — the app runs facial AI again and shows your name and “Matched”
- An Add Notes field appears for any remarks (e.g. “Leaving for day”)
- Tap Done — punch out is recorded
Viewing Your Punch Details
Tap the punch status shown in the home screen bottom bar to open your Punch Details:
| Field | What It Shows |
|---|---|
| Punch In time | Time you punched in |
| Punch Out time | Time you punched out |
| Project name | Which project the punch was recorded against |
| Location | GPS coordinates captured at punch time |
Part 3 — Setting Up Face Photos for Verification
Worker face photos must be uploaded before facial recognition will work during punch. Without photos, the AI cannot verify identity and the worker cannot punch in.
How to Upload Face Photos
- Tap the hamburger menu (≡) from the home screen
- Tap Payroll People
- Tap the worker whose photos you want to upload
- Tap Payroll details
- Scroll to the Photo Upload (For Verification) section
- Tap to upload — you can add up to 3 face photos using the camera
💡 Upload photos in different lighting conditions (indoor, outdoor, morning light, overcast) for better recognition accuracy across different site environments. Upload at least 2 photos per worker.
Other Fields in Payroll Details
While in Payroll Details, you can also configure:
| Field | What to Enter |
|---|---|
| Salary Amount | Daily or monthly salary in Rs |
| Edit Salary Breakup | Break down salary into components (Basic, Allowances, Deductions) |
| Shift Hours | Working hours per shift |
| Overtime Amount | Amount per hour of overtime |
| Designation | Worker’s role or title |
| Cost Code | Link salary costs to a project budget line |
| Salary to be calculated by | Shift wise: salary based on shifts marked. Punch difference: salary based on actual hours between punch-in and punch-out. |
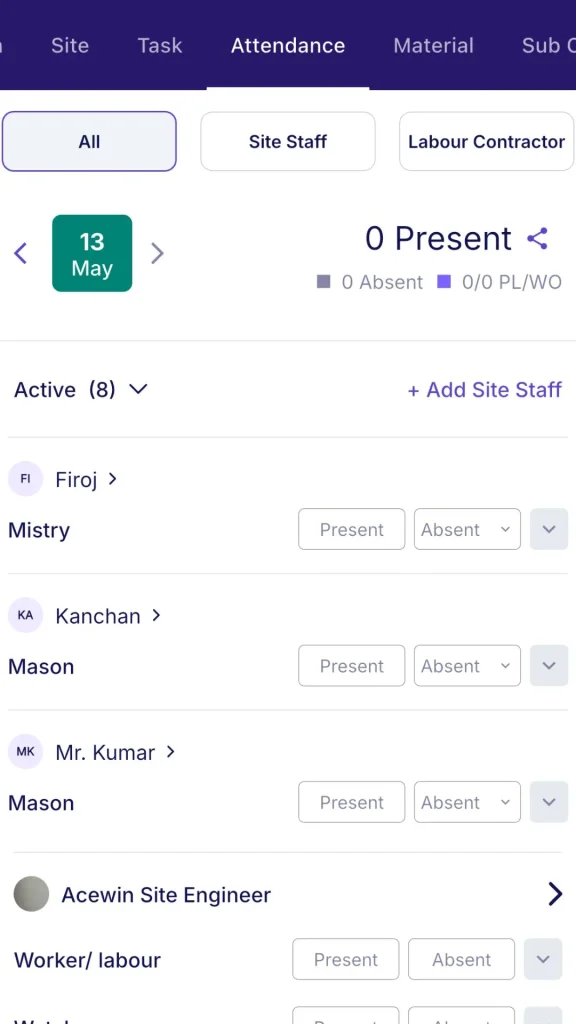
Part 4 — Managing Attendance in the Project
Opening the Attendance Tab
Open a project and tap the Attendance tab.
Three sub-tabs:
| Sub-tab | What It Shows |
|---|---|
| All | Combined view of all site staff and labour contractors |
| Site Staff | Individual staff members tracked by shift |
| Labour Contractor | Workforce grouped by contractor and workforce category |
Use the date navigator (left and right arrows) at the top to move between days.
Summary counters for the selected day:
| Counter | What It Shows |
|---|---|
| Present | Workers marked Present |
| Absent | Workers marked Absent |
| PL / WO | Paid Leave and Week Off count |
Site Staff Attendance
The Site Staff list shows each person with Present and Absent toggle buttons and a Shift dropdown.
Tap a worker to open their daily detail view:
| Field | What to Enter |
|---|---|
| Shift | 0.5, 1.0, 2.0, or Custom |
| Allowance or Deduction | One-off allowance or deduction for this day |
| Overtime | Number of overtime hours |
| Punch Records | Shows punch-in and punch-out times (read only) |
| Notes | Optional remarks |
| Site Staff Photos | Upload photos for this day |
Tap Save to record.
💡 If a worker has already been marked present at another project for the same day, they show a “Present elsewhere” indicator. You can still mark them present at this project — this is the correct workflow for workers splitting their day across two sites.
Adding a Site Staff Member
- Tap + Add Site Staff
- The Select Site Staff screen opens — search by name
- If the person is not in the system yet, tap + New Site Staff Payroll to create their profile
- Select the person — they are added to today’s attendance list
- Their salary type appears alongside their name
Labour Contractor Attendance
The Labour Contractor sub-tab shows workforce grouped by contractor. Each contractor group lists workforce categories (e.g. Mason, Male Helper, Female Helper, Cash Labour) with a headcount field.
Enter the number of workers present per category.
Adding a Labour Contractor
- Tap + Add Labour Contractor
- Select the Labour Contractor or Sub Contractor from the list
- Tap Add Workforce
- Select workforce categories from the Workforce Library and enter the count for each
Punch Out and Punch In from the Attendance Tab
At the bottom of the Attendance tab, Punch Out and Punch In buttons let you record punches directly from the attendance screen without going through the camera and facial recognition flow. Use these when manually recording attendance on behalf of workers.
When attendance is saved, a confirmation message appears: “Attendance Marked Successfully.”
Tips
- The nearest project is auto-selected at punch time based on GPS location. Workers near the site do not need to pick the project manually — they just confirm.
- Upload 2 to 3 face photos per worker in different lighting conditions. One photo in good light and one in shadow significantly improves recognition accuracy on site.
- Use Salary to be calculated by: Punch difference for staff paid by actual hours worked (e.g. security guards, equipment operators). Use Shift wise for workers paid a flat daily rate regardless of hours.
- The Present elsewhere indicator prevents accidental double-counting. If a worker is already present at another project, their attendance for this project is tracked separately — both are valid records.
- Use the date navigator to go back and mark or correct attendance for a previous day. Back-dated entries may be subject to the Back Dated Entry Control restriction configured in Settings.
If Something Goes Wrong
| Problem | Likely Cause | What to Do |
|---|---|---|
| Face not recognised during punch | No photos uploaded or poor-quality photos | Go to Payroll People, open Payroll details, and upload 2 to 3 clear face photos |
| Cannot punch — outside radius | Attendance radius restriction is enabled | Move closer to the project location, or ask Admin to adjust the radius in Attendance Settings |
| Wrong project auto-selected at punch | GPS not accurate or multiple projects nearby | Tap the correct project from the location list manually before confirming |
| Worker not in the + Add Site Staff list | Worker not created in Payroll | Tap + New Site Staff Payroll to create their profile, then add them |
| Attendance not saving | Role does not have Attendance Management permission | Ask your Admin to check your role permissions and enable Attendance access |
| Punch records not showing in the worker detail | Worker punched in via the quick action, not through the project | The punch record is linked to the selected project — confirm the correct |