
How to Create and Manage Project Estimates and Invoices
How to create a project estimate (BOQ) in Onsite from scratch, add line items with labour, material, and fee costs, apply markup and discount, set up milestones, review the project budget, and generate sales invoices against the BOQ. This article covers the full estimate lifecycle from setup to invoicing.
For deductions, retention, and invoice PDF customisation, see How to Create a Sales Invoice.
Before You Start
- You need Admin or Accountant access
- A project must already exist in Onsite
- Add materials to the Material Library before adding material costs to BOQ items
- Add the client as a party in CRM before linking them to the estimate
- Configure bank account details in Settings before generating invoices
Part 1 — Create a New Estimate (BOQ)
Step 1: Open the Estimate Tab
Inside the project, click the Estimate tab from the project navigation.
Step 2: Add a New Estimate
Click the + (Add) icon to create a new estimate.
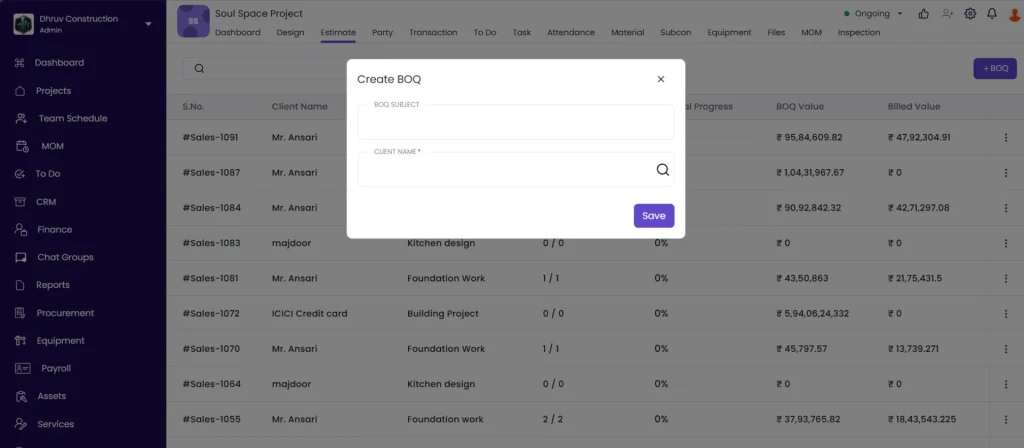
Step 3: Enter the BOQ Subject
Click the BOQ Subject field and type a descriptive name.
Use names that reflect the scope clearly:
| Good Example | Avoid |
|---|---|
| Civil and Structural Works | BOQ 1 |
| Electrical and Plumbing | New BOQ |
| Interior Fit-Out — Phase 2 | Estimate 3 |
Step 4: Select the Client
Click the client field and select the client from the dropdown. If the client does not appear, add them as a party in CRM first.
Step 5: Save
Click Save. The estimate is created and opens to the Items tab.
Part 2 — Add Items to the BOQ
Step 1: Add a Section
Click + Section to create a category group for your items (e.g. Civil Works, Electrical, Plumbing, Finishing).
Sections keep large BOQs organised. Items added without a section go into a default ungrouped list.
Step 2: Add a Line Item
Click + Add Item inside the section.
Enter the following:
| Field | What to Enter |
|---|---|
| Item Name | Description of the work or supply (e.g. “Brickwork in CM 1:4”) |
| Estimated Qty | Total quantity for the full scope of this item (e.g. 200) |
| Unit | Unit of measurement (e.g. sqft, RMT, nos, kg) |
Click + Add to save the item to the BOQ.
Step 3: Bulk Import Options
For large BOQs, you can add items faster using:
| Option | How to Use |
|---|---|
| From Library | Select items directly from your company’s pre-built Rate Library |
| From Quotation | Pull items from a CRM quotation linked to this project |
| From Other BOQ | Copy items from another BOQ in the same or a different project |
| Import CSV | Upload a CSV file with all items, quantities, and rates in bulk |
Part 3 — Add Costs to a BOQ Item
Click on a line item to expand it and add cost breakdowns.
Labour Cost
Click + Add Labour Cost.
| Field | What to Enter |
|---|---|
| Labour Type | Type of worker (e.g. Mistri, Carpenter, Electrician) |
| Cost per unit | Rate per unit of the item’s measurement (e.g. Rs 10 per sqft) |
Click Save.
Fees
Click + Add, then + Add Fees.
| Field | What to Enter |
|---|---|
| Name | Description of the fee (e.g. Equipment Hire Charges, Scaffolding) |
| Cost per unit | Amount per unit of the item’s measurement |
Click Save.
Material Cost
Click + Add, then + Add Material Cost.
| Field | What to Enter |
|---|---|
| Select Material | Search and pick from your Material Library (e.g. Red Clay Bricks) |
| Quantity | Material quantity required per unit of the BOQ item |
| Unit Rate | Rate per unit of the material |
Click Save.
💡 If the material does not appear in the search, it has not been added to the Material Library. Go to Library in the left sidebar and add it first.
Markup and Client Rate
The Client Rate field is the rate you will charge the client per unit, inclusive of your margin.
Double-click the client rate field on the item row and enter the markup amount or the final client rate.
The difference between the sum of labour, material, and fee costs and the client rate represents your project margin on that item.
Supply and Installation Rate
If a BOQ item covers both supply of materials and installation labour as a combined rate, click Add Supply and Installation Rate and enter the combined amount.
Cost Code
Click Add Cost Code on the item and select the relevant cost code category. Cost codes allow you to group expenses by type for reporting and budget analysis across projects.
Link Task
Click Link Task and select the relevant task from the project task list. Linking a task to a BOQ item means that task progress updates on site are reflected against this line item’s financial tracking.
Part 4 — Add Discount and Finalise the Estimate
Step 1: Open Discount Settings
After completing item setup, click Next to proceed to the estimate-level settings.
Step 2: Add a Discount
Click Add Discount and enter the discount amount in the Other Amount field.
For additional discount options, click Additional Discount.
The discount reduces the total estimate value shown to the client.
Step 3: Select Bank Account
Click Select Bank Account and choose the account to be printed on invoices generated from this estimate.
Step 4: Save
Click Save to finalise the estimate.
Part 5: Review the Budget Tab
Click the Budget tab inside the estimate to review the financial summary.
The Budget tab shows:
| Column | What It Displays |
|---|---|
| Estimated Cost | Total of all labour, material, and fee costs added to the BOQ items |
| Client Rate (Revenue) | Total of all client-facing rates (what the client will be billed) |
| Gross Margin | Difference between client revenue and estimated cost |
| Invoiced to Date | Total amount already invoiced against this BOQ |
| Remaining to Invoice | Client rate total minus invoiced to date |
Review the Budget tab regularly as invoicing progresses to track how much remains to be billed.
Part 6 — Set Up Milestones
Milestones let you define payment checkpoints tied to project progress. When a milestone condition is met, you can mark it as reached and trigger the corresponding invoice.
Step 1: Open the Milestone Tab
Click the Milestone tab inside the estimate.
Step 2: Create a New Milestone
Click + New Milestone.
Step 3: Enter Milestone Details
| Field | What to Enter |
|---|---|
| Milestone Name | A clear description (e.g. “Slab Casting Complete”, “50% Brickwork Done”, “Final Handover”) |
| Milestone Value | Percentage of the total BOQ value this milestone represents (e.g. 30 means 30% of the BOQ amount is payable on hitting this milestone) |
Step 4: Add a Dependency (Optional)
Dependencies define which BOQ item progress must reach a certain percentage before this milestone is considered met.
- Click + Add Dependency
- Select the BOQ item from the list
- Enter the Milestone Hit percentage (e.g. 100 means the item must be 100% complete before this milestone triggers)
You can add multiple dependencies per milestone. All dependencies must be met for the milestone to be eligible.
Step 5: Save
The milestone saves automatically and appears in the list showing name, value, amount, due date, dependencies, and status.
Step 6: Update Milestone Status
Click on a milestone to change its status as work progresses:
| Status | When to Use |
|---|---|
| Pending | Work not yet started on the milestone conditions |
| In Progress | Dependencies are partially met |
| Completed | All dependencies met, milestone conditions fulfilled |
Once a milestone is marked Completed, raise the corresponding invoice from the Invoices tab for the milestone amount.
💡 Milestone values across all milestones must not exceed 100% of the BOQ total. If the total exceeds 100%, review and adjust the individual milestone percentages.
Part 7 — Create a Sales Invoice from the BOQ
Step 1: Go to the Invoices Tab
Click the Invoices tab inside the estimate.
Step 2: Create a New Sales Invoice
Click + Sales Invoice.
Step 3: Select Items to Invoice
Tick the checkboxes next to the items you want to include in this invoice. You do not have to bill all items at once. Invoice only what has been completed or certified.
Click Next.
Step 4: Enter Invoice Quantity
For each selected item, enter the Invoice Qty: the quantity being billed in this invoice.
Onsite tracks cumulative invoice quantities. If 200 sqft was estimated and you invoiced 110 in Invoice 1 and 60 in Invoice 2, the remaining shows as 30 sqft.
Step 5: Select GST Rate
Select the applicable GST rate from the dropdown (e.g. 12%, 18%).
Step 6: Add Deductions and Retention (Optional)
Click + Deduction or + Retention to apply deductions (e.g. TDS, advance recovery) or hold back retention amounts.
For full guidance on deduction types, retention types, amount type options, and due dates, see How to Create a Sales Invoice.
Step 7: Save
Click Save. The invoice is created with an auto-generated number.
Step 8: View and Customise
Click View to open the invoice and set the Bill From address, Bill To address, Invoice No, Due Date, Bank Account, and Terms and Conditions. Click Save after changes.
Step 9: Download or Share
Click the download or share icon to export the invoice as PDF or send directly to the client.
Tips
- Use sections in your BOQ to organise items by trade (Civil, Electrical, Plumbing, Finishing). This makes large BOQs easier to navigate and makes the invoice line items clearer for the client.
- Import items via CSV if you have a large number of line items. Download the CSV template from the Import option to see the required format before uploading.
- Always link BOQ items to tasks so progress on site is reflected in financial tracking. A task marked 100% complete will show that BOQ item as fully delivered.
- Use cost codes consistently across all projects so your expense reports are comparable across jobs.
- Review the Budget tab regularly to track how much of the BOQ has been invoiced and how much is remaining.
- Milestone values across all milestones must not exceed 100%. Set milestone percentages carefully when adding multiple milestones.
- You can create multiple invoices against the same BOQ. Invoice in stages as work is certified rather than invoicing everything at once.
If Something Goes Wrong
| Problem | Likely Cause | What to Do |
|---|---|---|
| Client not in the dropdown when creating an estimate | Client not added to the system | Add the client as a party in CRM first, then return to create the estimate |
| Material not found when adding material cost | Material not in the Material Library | Go to Library in the left sidebar, open Material Library, and add the material |
| Bank account not showing in estimate settings | Not added in Settings | Go to Settings, then Bank Details, and add at least one account |
| Milestone values exceed 100% | Sum of all milestone percentages is over 100 | Reduce one or more milestone percentages so the total equals 100% or less |
| Invoice quantity exceeds estimated quantity | Invoice qty entered is higher than the BOQ estimated qty | Verify the correct quantity. If scope has changed, update the BOQ estimated qty first, then re-enter the invoice qty. |
| BOQ items not showing when creating a sales invoice | No items added to the estimate yet | Go to the Items tab of the estimate and add line items before attempting to invoice |
| Budget tab showing zero | No client rates entered on BOQ items | Open each item and enter the client rate |
| CSV import failing | File format incorrect | Download the CSV template from the import screen and use it as the base for your data |
| Cannot see the Estimate tab | Not added to the project or insufficient role permissions | Ask your Admin to check your role permissions and project access |