
How to Set Up Payroll for Staff in Onsite
How to add Office Staff and Site Staff in the Payroll module, configure their salary structure using salary templates and individual components, upload face photos for attendance verification, and assign Site Staff to projects.
Before You Start
- You need Admin or a role with Payroll access
- Create Salary Templates in Settings before adding staff — if multiple staff share the same salary structure, a template saves significant time
- Have each staff member’s phone number ready — it is used as their login credential for the Onsite app
Office Staff vs Site Staff
| Feature | Office Staff | Site Staff |
|---|---|---|
| Typical roles | Managers, engineers, admin, accountants | Foremen, supervisors, site-based workers |
| Salary type | Monthly | Monthly or daily wage |
| Attendance tracked at | Company level (Payroll, Attendance) | Project level (Project, Attendance tab) |
| Project assignment | Not required | Required before project attendance can be marked |
| Salary expense created in | Company-level Finance tab | Each project’s Transaction tab |
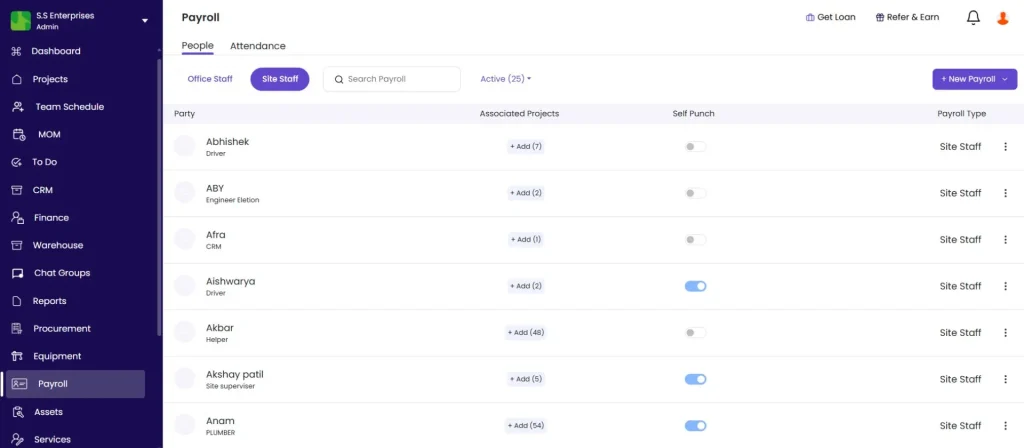
Where to Find Payroll
Click Payroll in the left sidebar.
The Payroll module has two sub-tabs: Office Staff and Site Staff.
Part 1 — Adding Office Staff
Step 1: Open Office Staff
Click the Office Staff sub-tab and click + New Office Staff.
The New Office Staff form opens.
Step 2: Fill in Staff Details
| Field | Required | What to Enter |
|---|---|---|
| Name | Yes | Full name of the staff member |
| Phone Number | Yes | Mobile number used as their Onsite login credential |
| Designation | No | Select from configured designations |
| Cost Code | No | Link salary costs to a budget line for financial reporting |
| Upload Photo | No | Face photo for AI face recognition in attendance. Upload a clear, well-lit photo. |
Step 3: Set Salary
| Field | What to Enter |
|---|---|
| Salary Amount | Monthly salary in Rs |
| Shift Hours | Working hours per shift (e.g. 8 hours) |
| Overtime | Overtime rate or rules applicable for this staff member |
Step 4: Add Salary Breakup (Optional but Recommended)
Click Add Salary Breakup to configure how the salary is divided into components. This is used to generate accurate salary slips and payroll reports.
Select a Salary Template:
Click Select and choose a template (e.g. “Senior Engineers”). The template pre-fills the component structure. Adjust individual values as needed for this staff member.
If no template applies, configure the components manually:
Basic Salary:
| Option | How It Calculates |
|---|---|
| % of CTC | Basic = the entered percentage of total CTC |
| Fixed Amount | Basic = a fixed monthly Rs amount |
HRA (House Rent Allowance):
| Option | How It Calculates |
|---|---|
| % of Basic | HRA = the entered percentage of the Basic salary |
| % of CTC | HRA = the entered percentage of total CTC |
| Fixed Amount | HRA = a fixed monthly Rs amount |
Additional Allowances:
Click + New Allowance to add components such as Food Allowance, Travel Allowance, or Medical Allowance. For each:
- Check the allowance type
- Set the calculation method (% of CTC, % of Basic, or Fixed Amount)
- Enter the value
Deductions:
Deductions are pre-filled from the template (e.g. PF at Rs 1,800). To add or edit:
- Click + New Deduction
- Select the deduction type (e.g. PF, TDS, Employer PF)
- Set the calculation method and amount
The Net Amount updates automatically as components and deductions are configured:
Net Amount = Gross Salary minus Total Deductions
Step 5: Save
Click Save. The staff member appears in the Office Staff list.
Part 2 — Adding Site Staff
Site Staff are assigned to specific project sites. Their attendance is tracked per project, and salary expenses are created at the project level.
Step 1: Open Site Staff
Click the Site Staff sub-tab and click + New Site Staff.
Step 2: Fill in Staff Details
Fill in the same fields as Office Staff: Name, Phone Number, Designation, Cost Code, and Upload Photo.
Then set the salary:
| Field | What to Enter |
|---|---|
| Salary Amount | Monthly or daily rate in Rs |
| Add Salary Breakup | Optional — configure template-based breakup same as Office Staff |
| Shift Hours | Working hours per shift |
| Overtime | Overtime rate or rules |
Step 3: Assign to Projects
Click + Add to assign this staff member to one or more projects. Select projects using the checkboxes and click Save.
⚠️ Site Staff must be assigned to a project before their attendance can be marked at the project level. A Site Staff member not assigned to any project will not appear in the project Attendance tab.
A Site Staff member can be assigned to multiple projects. Attendance is then tracked separately per project, and a separate salary expense is generated for each project where attendance is marked in a given month.
Step 4: Save
Click Save. The staff member appears in the Site Staff list with their assigned projects listed.
Part 3 — Uploading Face Photos
Face photos are used for AI face recognition during attendance punch-in. The face recognition system compares the live camera image against the uploaded photo.
Best practices for face photos:
| Guidance | Reason |
|---|---|
| Clear, well-lit photo | Poor lighting causes recognition failures |
| Face directly facing the camera | Side angles reduce matching accuracy |
| Plain or neutral background | Busy backgrounds affect detection |
| Upload 2 to 3 photos per person | Different lighting conditions improve accuracy across site environments |
| No sunglasses or hat | Occlusions prevent the face from being detected |
How to upload:
- Open the staff member’s profile in Payroll
- Click the photo upload area or the Upload Photo button
- Select the image file
- Click Save
💡 Upload face photos in different lighting conditions (indoor, outdoor, morning, afternoon) so the system can recognise the worker accurately across different site environments.
Part 4 — Editing Staff Profiles
To edit any detail after a staff member is created:
- Click the staff member’s name in the Office Staff or Site Staff list
- The profile panel opens on the right
- Click Edit
- Update the required fields
- Click Save
To change project assignments for a Site Staff member:
Tips
- Set up Salary Templates before adding staff. If 10 engineers share the same salary structure, create one template and apply it to all. Only the base CTC amount needs to be adjusted per person.
- PF deduction is typically a fixed amount of Rs 1,800 per month (12% of basic salary capped at Rs 15,000). Confirm the rate with your CA and set it as a Fixed Amount deduction in the template.
- Face photos uploaded in Payroll are the same photos used by AI face recognition in Attendance Settings. Upload quality photos before enabling face recognition.
- Site Staff can be assigned to multiple projects simultaneously. When marking attendance on Project A, only Project A’s salary expense is generated for that month.
- If a staff member changes projects, update their project assignment in Payroll immediately. Attendance cannot be marked for a project they are not assigned to.
- The Cost Code field links the salary expense to a budget category in financial reports. If salary costs need to appear in expense reports under a specific category (e.g. Site Labour, Engineering), set the cost code here.
If Something Goes Wrong
| Problem | Likely Cause | What to Do |
|---|---|---|
| Cannot find Payroll in sidebar | Role does not have Payroll access | Ask Admin to check role permissions and enable Payroll access |
| Salary Template not appearing in the dropdown | Template not created in Settings | Go to Settings, then Salary Template, and create the template first |
| Project not showing in the assignment picker | Project does not exist yet | Create the project first in the Projects module |
| Staff not appearing in the project Attendance tab | Site Staff not assigned to that project | Open the staff member’s profile in Payroll, click Edit, and assign the project |
| Face recognition failing for a staff member | Poor photo quality or no photo uploaded | Upload 2 to 3 clear, well-lit face photos in the staff member’s Payroll profile |
| Net salary amount looks wrong | Wrong calculation type selected for a component | Open the salary breakup, check each component’s calculation method, and correct |
| Office Staff not appearing in attendance grid | Not added to Payroll | Add them via Payroll, then Office Staff, then + New Office Staff |